Three letters, so many meanings. But today, I’m talking savory. Empanadas, pasties, patties, pork buns, egg rolls, wontons or vegetarian – think samosa or shingara – and that’s without considering the rice paper variations. Around the world, filled dough is a constant – what’s the reason for the popularity – portability? Or just plain deliciousness? I don’t know but I am certainly grateful for the invention.
In the case of Russia, it’s piroshki.

There’s the big, dinner plate version, pirog, but the ones I am talking about are the diminutive, single serving ones. They can be yeasty, deep fried handfuls, closer to the Georgian cheburek, or made with short pastry, as with our family recipe.

This was the ultimate hors d’oeuvre in our house when I was growing up. Delicate, sophisticated, buttery, flaky little torpedoes nestled in cocktail napkins next to the highball glasses, they meant a party was on. My mother made them for major holidays. When my aunt passed away and her granddaughter took up the torch of preparing for the Easter holiday, we began a custom of making them together, rolling and filling several hundred in an afternoon on the big dining table, presided over by photos of my aunts as young girls in Russia. I’m sure they would have approved.
While meat is the filling most people know best, mushroom and cabbage are also delicious – all three fillings are below.
I have cut the original recipes in half. It is difficult to say how many piroshki you will get, depending on what size cookie cutter (or glass) you use, how much filling you manage to stuff in, how thin you roll the dough. A rough estimate is about 100 pieces for the pastry. The cabbage and meat fillings should each be enough for one recipe of dough, so you can either cut the recipes below in half or freeze the fillings for another use (or double the dough and invite someone over to help you roll and fill them). The mushroom filling will make around 25-30 pieces.
I have found that the easiest way to make these is to prepare the dough and the fillings on one day, and to do the rolling and filling the next. If you need to wait more than one day between these steps, then freezing both dough and fillings is recommended.
Piroshki
Meat Filling for piroshki
1lb ground beef (chicken is fine, too)
2 oz butter
1/2 large onion
3 hard boiled eggs, chopped fine
3-4 T parsley, chopped fine
3-4 T dill, chopped fine
In a large skillet (do not use non-stick if you would like to save on dishes and prepare the filling entirely in the pan. If you only have non-stick, transfer when cooked to a bowl to continue prep), saute the onion in half the butter over medium heat until soft and transparent. Push to the side and add the ground meat, cook until no longer pink, breaking up the chunks as it cooks. Remove from heat, and with a potato masher, adding the rest of the butter. Add the chopped hard boiled eggs and herbs, and continue to mash until the mixture is quite fine and the pieces of meat are very small. Add salt and white pepper to taste. The mix should taste a bit saltier than you would like if you were to eat it on its own; if you don’t salt enough, the filling won’t be as flavorful once baked in the pastry.
Allow to cool and then chill completely.


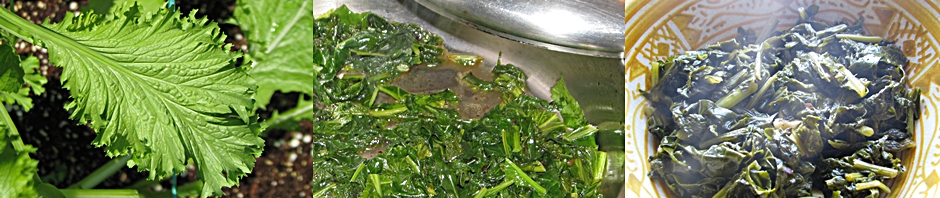
Cabbage filling for piroshki (this is not an exact science, given that cabbages vary wildly in size)
1 medium head cabbage, about 3 lbs
4 oz butter
3 hard boiled eggs, chopped fine
Dill, chopped fine, to taste
Salt and pepper to taste
Shred the cabbage in a food processor if you have one, otherwise slice finely. If you like you can blanch the cabbage in boiling water for a minute and then drain and squeeze dry, but usually I don’t bother with this step. Melt the butter in a large frying pan and add the cabbage. Stir well to start it wilting and then cover and cook over medium low heat, stirring occasionally to prevent burning. When the cabbage is quite soft, take off the cover so that any accumulated moisture boils off. The cabbage should be dry when you remove it from the heat. Cool slightly and then mound on a large cutting board. Chop with a large knife and then add chopped eggs and dill, salt and pepper (same salting rule as for meat applies) and chop some more. The mixture should hold together when you squeeze some together in your palm, but you don’t want complete mush either. You can pulse a couple of times in a food processor but be careful to avoid ending up with paste. Chill.


Mushroom filling for piroshki
1 lb mushrooms, trimmed of stems and sliced – cremini are nice but plain button mushrooms will do
4 T butter
Pinch cayenne
1/8 tsp freshly grated nutmeg
1 bay leaf
Juice of ½ lemon
3-4 Tbsp sour cream
A little tarragon if you have it
Salt and pepper to taste
Melt the butter in a large frying pan. Add the mushrooms and the bay leaf. Saute until mushrooms render their liquid and begin to brown. They should be dry but not crisp when you are finished. Stir in the spices, salt and pepper and cool slightly. Chop on a cutting board or pulse in food processor (same as for cabbage. Stir in enough sour cream to bind the mixture. Chill.
If you really like mushrooms and want more, then double the ingredients.


Short Pastry for piroshki (and lots of other things)
This pastry is great. The first time I made these after many years, with no access to my mother or aunt, I was baffled by the amount of water. But don’t hesitate. The amount of fat and the lamination result in a crust that is both flaxy and delicate as well as fantastically malleable and easy to work with. The dough freezes really weIl and can be used for other applications – leftovers once made a glorious open faced blueberry pie – well before the most recent salted-dessert phase, the saltiness of the dough set off the fruit beautifully.
The original recipe – transposed from Russian in early 20th century America – calls for 1/3 butter, 1/3 margarine (“nucoa”) and 1/3 crisco. It makes me wonder if in Russia they used a combination of butter, lard and something else. In any case, I have used various combinations, including rendered beef fat, but like best ½ butter and ½ any organic vegetable shortening I can find, such as palm shortening. Coconut might be ok if you take very good care to keep the dough chilled.
6 oz butter
6 oz shortening
3 heaping cups flour (so 4 oz shortening per cup flour) – the heaping had me troubled for awhile as I didn’t know how heaping. I haven’t weighed the flour for this recipe but I think 5 oz per cup would be fine
1 Tbs sugar
3/4 tsp salt
1 beaten egg mixed in 7 oz ice water (3/4 c plus 2 Tbsp)
Make sure fats are cold. Measure the flour into a large bowl, add the sugar and salt and mix well. Cut the shortening into cubes and add to the flour. I add the fats separately because the degree of hardness is different for each one. Note that if you are working with very hard palm shortening, you should add it after the butter, not before; you may wish to grate it into the flour with a large box grater if you are not using a food processor.
Working quickly rub the shortening into the flour with a pastry cutter, two knives or your fingertips. You can also pulse it several times in a food processor. Do not worry about combining completely. The original instructions say “leave large lumps”. Add the butter and do the same. In a separate bowl, mix the egg and water till well combined. Pour the liquids into the flour/butter mixture and mix quickly to combine. Gather the dough into a ball and then divide into two equal pieces. Take one piece and pat or roll gently out into a rectangle about 3-4 inches wide and 10 inches long. Fold into thirds and make one turn, then roll again and fold into thirds. (this is similar to the process of making puff pastry). Do the same with the second piece of dough. Wrap in plastic and chill well.


Filling and Forming
When ready to fill, take one piece of dough out and make one more turn and fold. If you do not have a very large space to roll the dough, cut it in half and return one half to the fridge while you work with the other piece. Roll out very thinly, about 1/8 to 1/16 inch. Honestly, I have not measured this because I find it pretty difficult to hold a ruler next to a thin piece of dough, especially when my hands are covered with flour. There is a picture below which shows the varying thicknesses. Both are ok. Obviously you will end up with fewer piroshki if you roll them thicker. It depends on personal taste, whether you prefer more pastry or just the barest covering of the filling. Try both and see which you like better.
Cut circles with a jar or cutter to required size (2″ to 5″). Place two to three teaspoons of filling onto each circle. If the fillings are cold, you can squeeze them into a firm shape so that there is a clean rim of dough around them. Dip your finger into a cup of water and wipe very lightly around the exposed edges of the dough – this will help to seal them together.
Note on shapes: When I am making several different fillings at once, I like to know which ones are which. In this case, the meat filling is encased in a torpedo shape – the edges of the circle are pinched together and then folded under to make a torpedo with two pointed ends. For the cabbage, the circle is folded over into a half moon, which can be crimped with a fork if desired. For the mushroom, I cut small squares instead of circles and fold them to make small triangles.
As the piroshki are prepared, place them, seam side down, on a tray covered with parchment paper. Ensure they are not touching or they will stick together.
Continue to roll, cut and fill, until the dough or filling are used up.
If you intend to bake them immediately, chill the trays as they are filled to avoid the dough getting too soft.

clockwise from top left, folding meat rounds. meat filling “torpedoes”, cabbage half moons, mushroom triangles

both thicknesses are fine, depending on your tastes and how far you want to stretch the dough
Baking
Pre-heat the oven to 375F.
Mix an egg yolk with a small amount of cream or milk and brush the tops of the piroshki with a pastry brush (if you don’t have one a paper towel folded up will work too).
Bake about 18-20 min. or until lightly browned.
If you wish to bake another day, flash freeze the piroshki on the trays and when completely frozen place in plastic bags or other closed containers in the freezer. They will keep well several months.


Yeah, love your blog! Such a great idea and so excited that you are doing this!!!xxx from an aging cousin…M
Thank you Katherin, I have wanted these recipes ever since i first tasted them at Nina’s! And reading them over, now I know wht they are so fantastic! Love the bolg, looking forward to reading all of it…